What Is Balayage Hair Color: Your Guide to Highlight Trends
What Is Balayage Hair Color: Your Guide to Highlight Trends

Let’s be real: using a straightener to curl your hair sounds like trying to write with an eraser. It feels wrong, but trust me, it’s the secret to getting those perfect, lived-in waves that look like you just woke up cool.
Unlike a curling iron that gives you perfect ringlets, a flat iron creates a looser, more modern “S” wave. It’s way easier than it looks, and once you get the motion down, you’ll be doing it in minutes. Don’t worry — we’ll walk through it step-by-step.
First things first: your hair must be 100% dry. I mean bone dry. Using a hot tool on even slightly damp hair will literally boil the water inside your hair shaft, causing major damage. No thanks.
Next, grab a heat protectant spray. This is non-negotiable! Think of it as sunscreen for your hair. A light mist all over is all you need. Then, give your hair a quick brush-through to get rid of any tangles.
I know it’s tempting to just grab random chunks of hair, but that’s a one-way ticket to a tangled mess. Taking a minute to section your hair will save you time and frustration. Seriously.
Clip up the top half of your hair and start with the bottom layer. From there, work with small, one- to two-inch sections. The smaller the section, the tighter the curl will be.
More heat does not equal better curls—it just equals more damage. If you have fine or color-treated hair, start on a lower setting, around 300-350°F. If your hair is thick or coarse, you can bump it up to 375-410°F.
The trick nobody tells you is to find the lowest temperature that still gets the job done in one pass. You shouldn’t have to go over the same section again and again.
Okay, here’s the magic move. Take one of your sections and clamp the straightener near the root, about an inch or two away from your scalp. You don’t want to start right at the root unless you’re going for major volume.
As soon as you clamp down, immediately rotate the straightener 180 degrees (a half-turn) away from your face. Your hair should now be wrapped once around the outside of the flat iron barrel.
While keeping the iron clamped and flipped, slowly pull it down the length of your hair section. The key is maintaining a smooth, consistent speed. Don’t stop and start, or you’ll get weird crimps and dents.
If you pull too fast, you’ll get a very loose wave. If you pull too slow, you might get a super tight curl (or a burn mark). Aim for the speed you’d use if you were casually drawing a line in the sand. It’s a feel thing you’ll pick up quickly.
Now just keep doing that! Work your way around your head, section by section. For a more natural, less “perfectly done” look, alternate the direction of your curls.
Curl one section away from your face, then curl the next section toward your face. I always recommend curling the front pieces that frame your face *away* from your face—it’s just more flattering and opens everything up.
This is so important! Do not touch your curls while they are still warm. Heat sets the style, so letting them cool completely helps them last all day. They’ll look a little tight and bouncy at first, kind of like Shirley Temple’s.
Once they’re totally cool to the touch, gently run your fingers through them to break them up. You can also flip your head upside down and give it a good shake. A spritz of texture spray or a light-hold hairspray is all you need to finish.
Not all flat irons are created equal for this job. You want one with smooth plates and rounded edges to avoid snagging. Here are a few of our favorites this year.
The ghd Chronos Max Styler will set you back $284. It’s designed for long, thick hair, making quick work of styling sessions that used to take forever.
Its extra-wide plates mean you can style more hair at once, and its motion-responsive tech keeps the heat totally even. Reviewers say it leaves their hair feeling swishy and looking sleek in just one glide, which is perfect for creating smooth, flowing curls.
The Downside: That price tag is definitely an investment, so it’s best for those who use their straightener very frequently.
At $499, the Dyson Corrale is the ultimate splurge for hair that’s seen better days. It’s especially great for anyone with damaged or frizzy hair.
Instead of solid plates, this one uses flexing copper plates that gather and shape the hair. This means less tension and less heat are needed, which translates to shinier hair with way less damage. It’s also cord-free for up to 30 minutes, which is super convenient.
The Downside: It’s incredibly expensive and a bit heavier than most other straighteners on the market.
For just $60, the CHI G2 is a fantastic workhorse for pretty much any hair type. It’s a solid choice if you want a tool that can do it all without a huge price tag.
The titanium-infused ceramic plates are known for their super smooth glide, so you won’t get any pulling or snagging while you’re twisting and curling. The digital display makes it easy to set the perfect temperature for your hair type, giving you silky results every time.
The Downside: Because the plates are a bit wider at 1.25″, creating very tight, defined curls can take a little more practice.
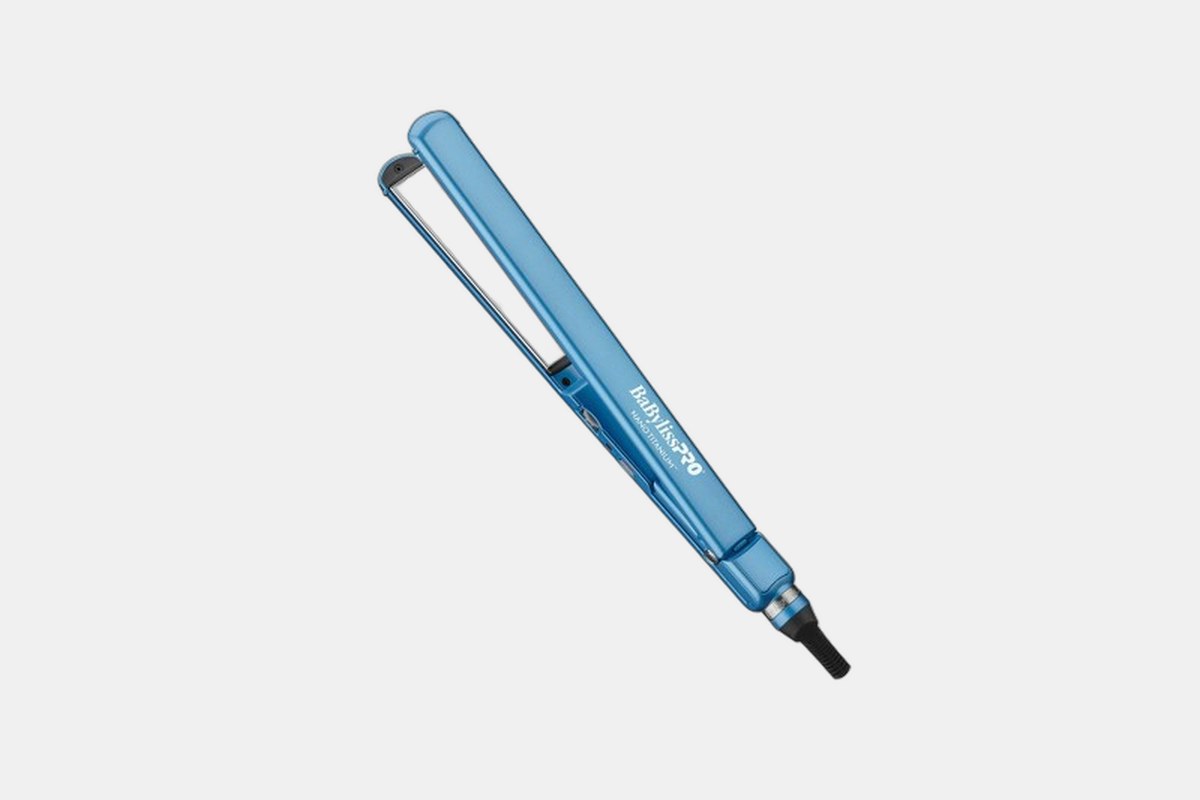
The BaBylissPRO Nano Titanium costs $200 and is a holy grail for anyone with thick, coarse hair that usually fights back against heat styling.
This thing is a powerhouse. The ultra-thin titanium plates get super hot (up to 450°F) and do it fast. It flattens stubborn hair in just a few passes, leaving it incredibly silky and shiny, which translates to beautifully smooth, frizz-free curls.
The Downside: All that power can be a bit much for very fine hair, and some users report a slight drag on delicate textures.
Priced at $160, the T3 SinglePass Curl X is a dream for creating big, beachy waves on thick or curly hair.
It has smart sensors that automatically adjust the heat across the plates, ensuring you get a consistent curl from root to tip in just one pass. Hairstylists love it for its ability to smooth frizz while adding shine, making it perfect for those effortless, undone styles.
The Downside: It’s on the pricier side, especially if you only plan on creating waves occasionally.
You can’t beat the price on this one: the Remington Shine Therapy is only $30. It’s an amazing budget-friendly option, especially for curly hair types.
The ceramic plates are infused with argan oil, which sounds like a gimmick but actually helps nourish the hair and add shine as you style. It has nine different heat settings, so you can easily customize the temperature to protect your curls from unnecessary damage.
The Downside: The overall build feels less premium and durable compared to more expensive models.
Another great find at $30, the Hot Tools Ceramic Flat Iron is a versatile tool that’s great for both straightening and creating simple, loose waves.
Its ceramic plates offer a fantastic glide for smooth, even results on most hair types. Testers found it has very little resistance and heats evenly, making it a reliable choice for basic curling techniques without breaking the bank.
The Downside: It’s not the best option if you’re trying to create really tight, defined, or springy curls.
Don’t get frustrated if your first few attempts look a little… abstract. The wrist-flick motion is the trickiest part, and it just takes a few tries to get the hang of it. I promise, it’s all muscle memory.
Soon enough, you’ll be whipping up perfect waves without even thinking about it. Now go grab your flat iron and give it a try!
What Is Balayage Hair Color: Your Guide to Highlight Trends
10 Best Leather Conditioners
10 Best Mild Shampoos
23 Best Clarifying Shampoos